Nowadays, contact forms such as gravity forms are increasing rapidly at a swift pace. According to the recent stats, it is estimated that 714,002 sites have successfully connected to the gravity forms. Building a solid bridge between the consumer and the store owner is possible with the leading contact forms, i.e., gravity forms, and more.

What are Restrict Dates in Gravity Forms?
Restrict Dates in Gravity Forms is a Gravity Forms integrated add-on that enables users to restrict the selected dates in the user’s form date picker field.
This add-on allows users to incorporate a date field into your Gravity Form and allows you to manage it effectively. You can simply restrict or permit dates for your users by choosing the date ranges and days from the back-end settings.
Key Features of Restrict Dates in Gravity Forms
Here are some of the most essential key features of restricting dates in gravity forms that include:
- Allows admin to use two filters in the date field, such as minimum and maximum date ranges.
- Allows support to integrate and set up multiple forms.
- Enables or restricts users from selecting any past or future dates.
- Restricts by day of the week – limits selectable days of the week.
- Adds exceptions for specific dates such as control availability for any particular date or day on all the calendars.
- Provides the option to limit dates and days, such as determine particular days of the week that will be selected for use.
- Linking dates with relevant predefined fields such as any particular date can be used as a comparative standard with another field date.
- Easy-to-Use – Manages settings and configurations with relative ease.
- Automatically aware of your users, as if their selection is valid or not.
Usage of Restrict Dates in Gravity Forms
Restrict Dates in Gravity Form can be used for multiple purposes; some of them are explained below:
- Bookings and Appointments– This add-on can be helpful for bookings and appointment purposes, as it enables users to fill all the fields as per the form details and appoints bookings accordingly, i.e., dentists, doctors, pharmacists etc.
- Entertainment Tickets – Enables users to easily book or purchase tickets for multiple purposes, i.e., entertainment, tourism etc.
- Holidays Planner – This add-on can be used to create a holiday planner form to manage and maintain your scheduled leaves or holidays as per your preferences.
- Online Consultancy – Enables users to easily create forms to book appointments for the online consultants and vice versa.
How to Use Restrict Dates in Gravity Forms Plugin?
The steps discussed below are necessary to set up and configure the restrict dates in gravity forms:
Step # 1:
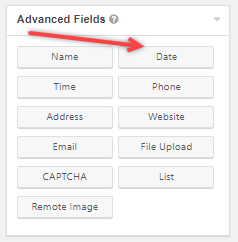
The initial phase is to create a form and select the “date” option to implement a date field. The user will find this option under the “advanced fields” section.
Step # 2:
After you have selected, navigate to the date field settings

Step # 3:
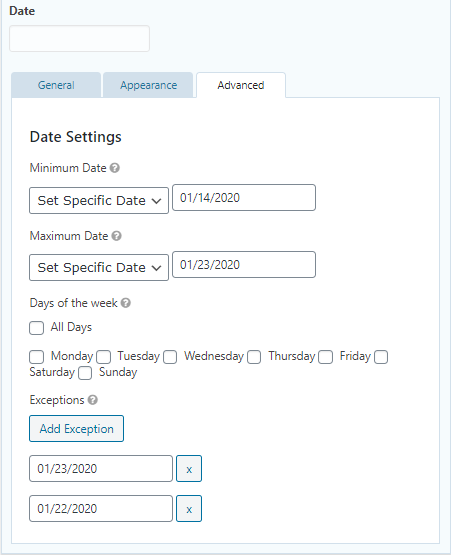
Navigate to the “Date Field” section and click on the “Advanced” tab as shown in the screenshot below:

Step # 4:
- Admin can adjust the minimum date, maximum date, and days of the week as per your requirements.
- The Minimum and Maximum Date Settings will enable users to specify the beginning and ending dates within the date field.
Step # 5:
- In the date settings, the user can set a particular date by selecting the following option in the drop-drop menu bar. After selecting the “set specific date” option, you can add the date you want in the field next to the menu.
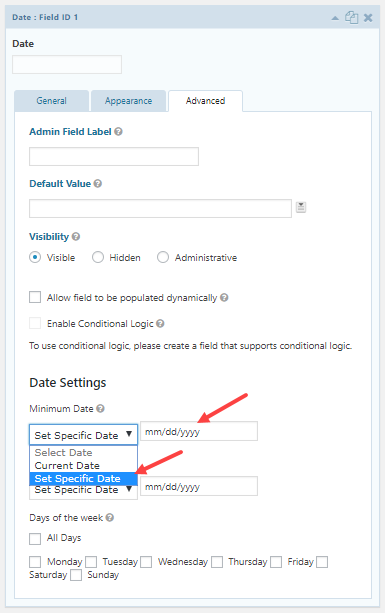
- The user can set both the earliest (minimum) and the latest dates (maximum) under the date settings.
Step # 6:
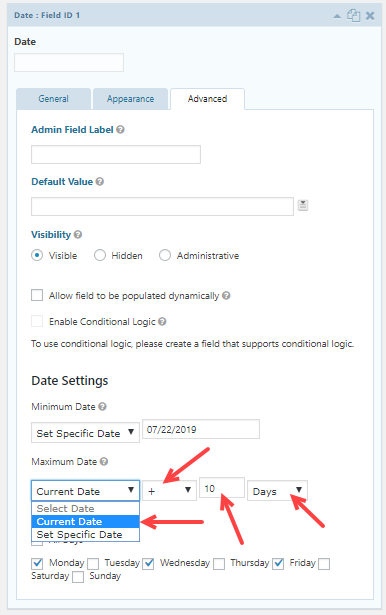
- The user can set the earliest (minimum) or the latest date (maximum) in the current date field by choosing the “current date” option in the drop-down menu bar.
Step # 7:
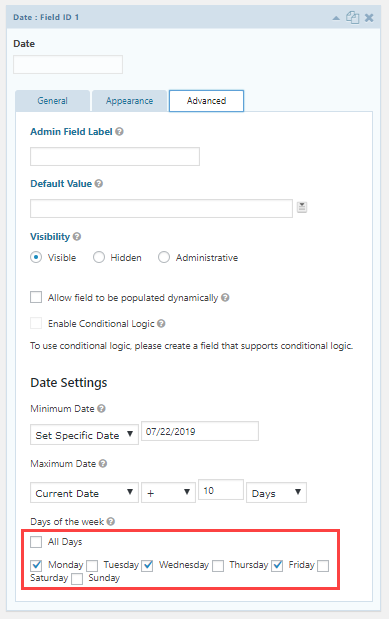
- The user can set the days of the week by restricting dates under specific criteria, and the user needs to restrict selectable days of the week. (e.g., Monday – Sunday).
- By default, all the days are valid, and you need to uncheck the “all days” option and proceed to the select specific days to set your specific parameters.
Step # 8:
If the user wants to incorporate an exception date, you can add it by clicking the add exception button. An exception can easily work with both selectable dates and unselectable dates, and if the expected date is selectable, it can also be unselectable. If the expected date is unselectable, it will now be easily selectable.
Step # 9:
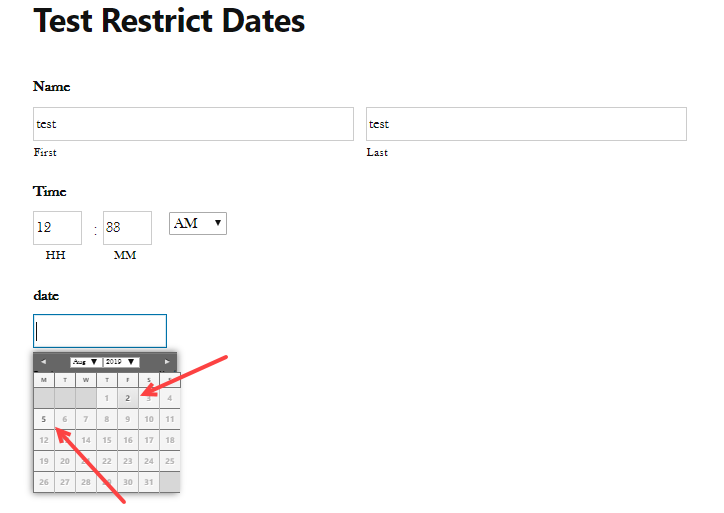
- At the front-end screen, you can see the date field that shows days from 22/7/2019. The following days Tuesday, Thursday, Saturday, and Sunday, are now readily displayed.
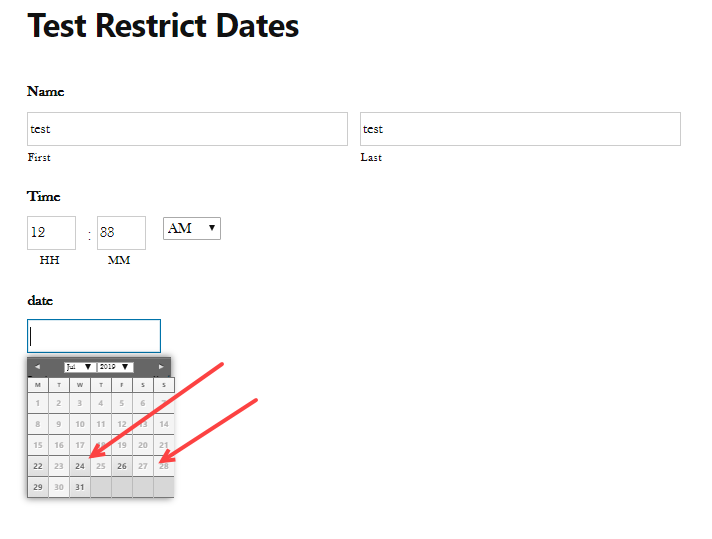
- The “10+ days” condition was executed in the date field. This means that over 10 days were added after the current date. Moreover, the days that are selected are now disabled.
Final Verdict
To sum up, restricting dates in gravity forms provides a comprehensive and robust way to restrict the selected dates in the user’s form. Hence, this article provides starters or beginners astounding ways to understand and adapt awareness of the product.
To know more about the product, read the technical documentation here